Pages

October 24, 2013

DIY Monogrammed Fall Wreath

I bring you another Pinterest success story just in time for fall decorating, and if you do it right, you can swap many of the elements out for a Christmas version (more to come on that one).

Here's the Pinspiration from the wonderful Etsy store theembellishedhome where it was sold out:

Photo copyright theembellishedhome

Here's my version:


I was able to get all of the materials at my local Hobby Lobby, which made it easy to shop and assemble the wreath all in one weekend. Total cost of the materials ran about $50; if you make one with a friend, you could easily save $10-15 by using coupons and sharing the decorative ribbon. If I had been focused, I think I could have completed my wreath in two hours, but Surviorman was on TV that night and I kept getting distracted by how he was able to keep a fire burning through a thunderstorm.  You know how it is.

Materials

  • Wreath frame (20-inch diameter)
  • Floral wire or pipe cleaners
  • Wire cutters
  • 3-4 hydrangea blossoms
  • 2 bundles of plain burlap ribbon, each 8 inches wide by 15 feet long (If you purchase narrower burlap, expect to use 3 to 4 rolls.)
  • 2 rolls of decorative burlap ribbon (1 solid, 1 print)
  • 12-inch letter
  • Hot glue gun


Step 1
Attach the burlap ribbon to the cross piece of the wire wreath frame. I found that "basting" the ribbon with a piece of the floral wire (about 4 inches long) then wrapping the wire around the wreath frame with a few twists secured the ribbon easily.


Step 2
Create a loop and attach the burlap to the next wire in on the wreath frame. A couple of things to note: This is not a science, and your loops don't have to be perfect. Just work your way up and down the wreath frame, shoving the loops together and adding more. It takes a while to work around the wreath, but you'll use both rolls of burlap.


Step 3
When you've made it all the way around with the burlap it will look something like this. Notice the "bare" spot in the top right (2 o'clock) where you'll attach the bow.


Step 4
Time to make the bows. Make four loops out of your solid burlap ribbon and tie them together with floral wire that is 7-8 inches long (don't cut off the excess wire).


Step 5
Make another four-loop bow slightly smaller than the solid bow. Use the wire on the solid bow to create the knot.


Step 6
Use the floral wire to attach the stacked accent bow to the wreath base, and then adjust it until you like how it appears. You may also need to adjust the burlap below it so that the ribbon lays properly.


Step 7
Use your wire cutters to remove the leaves from the floral stems. Cut the blossoms off the floral stems, leaving just 1 inch of stem on the blossom. This is enough to secure to the burlap with hot glue.


Step 8
Keep the wire cutters out. Flip the wreath over and wind the wire ends from the burlap back up into the wreath. Trim the ends were necessary. They key here is to make sure you can run your hand along the back of the wreath without being scratched. Adjust any rough spots so you don't damage your door.

Step 9
Attach the flowers with minimal hot glue if you want to be able to swap out the colors with the seasons. Wire the letter to the wreath. I also added a few hot glue dots here and there because I didn't want the letter to shift. My floral wire was green, so i hit it with a Sharpie marker and a decorative gold marker to mimic the detail on the letter. You can't tell unless you're up close to the letter, which is fine -- it's a wreath, people!


October 16, 2013

Swapping Fall: Neighborhood Project

Recently our family had just returned from a fro-yo outing after dinner when there was a knock at the door. My husband went to check it out after I gave him the I'm-not-the-kind-of-girl-who-answers-doors-at-night look. He came back in carrying this cute gift that was left on our doorstep with a note.


Officially, our basket arrived with a teddy bear, 2 fall themed kitchen towels, 2 packs of crayons, 1 pack of markers, 4 apples, 3 small bottles of bubbles, and a delicious bag of oatmeal spice cookies. The cookies were the first to disappear, and it took everything I had to keep our daughter focused on the teddy bear and not blowing bubbles inside the house that night. Someone in our neighborhood knows we have a toddler!

Inside we found an explanation and directions:


This now hangs next to our front door.
Since it was my turn to "Pass It On," I put together this basket for our neighbors who have two teenage daughters, two cats, and a dog.


I filled a chicken wire basket (bought at Joann's with a 40% off coupon, of course) with a picture frame, 2 fall themed kitchen towels, a bottle of sparkling cider, a box of Starbucks hot cocoa with marshmallows, a can of whipped cream, a homemade pumpkin pie (we enjoyed its twin), and small bags of dog and cat treats for their furry family members.

I'll admit that I broke the rules -- I didn't leave this on their doorstep. Instead I rang the doorbell, handed it to our neighbor, and said "You never saw me, but I didn't want to risk leaving a homemade pie on your doorstep overnight," to which she laughed.

Happy Fall Ya'll!

October 14, 2013

Big Finish: Cropped Lone Star Quilt

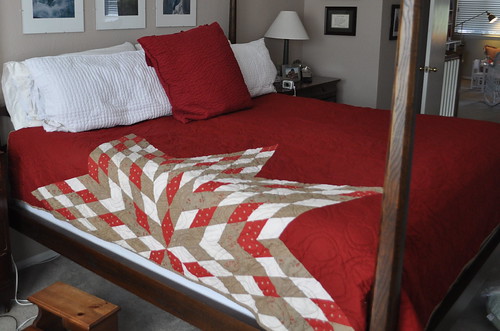
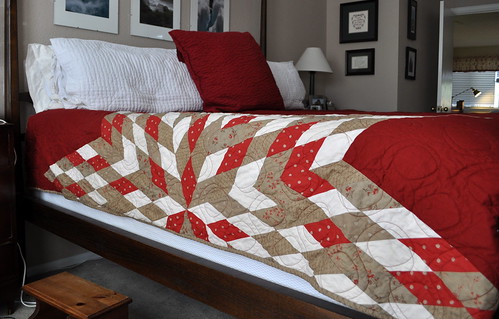
Cropped Lone Star Quilt

I'm so happy to be able to share these photos of the finished king-size Lone Star quilt that I've been working on for a large part of this year.  I created the top, backing, and binding for my college friend Marcy, and then I sent it to her to arrange longarm quilting and finishing.

I wrote about this project when I had the star in progress back in July.  I started with loads of fabric:


I prewashed and pressed everything, and then I cut strips for the star:


I sewed 6-strip units and cut them on a 45-degree angle to create the large diamonds for the star:


I used y-seams to insert pieces of solid red between the points of the star:


I added strips of red to the top and bottom of the star panel to achieve the desired length of 95 inches:


The star panel was a little over 1/3 of the desired width for the quilt - 105 inches - so I added two red panels to fill out the rest of the width.  I squared it up as best as I could along the way (king-size is huge!), and packed everything up to mail to Marcy.  She met with the longarm quilters at A Better Quilt (http://abetterquilt.com/) to select a quilting design, and they had it done for her in a week - impressive!

Cropped Lone Star Quilt

The large swirly design softens the sharp lines of a quilt this size, and I think it turned out so great.  I'm pleased that Marcy and her family are so happy with the quilt, and I hope they enjoy it for many years.  I wouldn't say that a king-size Lone Star quilt was on my quilting bucket list, but now I can put it on and check it right off.  Done!

Cropped Lone Star Quilt