Pages

September 1, 2015

New Favorite Reversible Tote


When a project catches my eye, it tends to stay with me. This tote from Very Shannon has been rattling around in my mind since January, I think, when it showed up in my daily tutorial email from Sew Can She (http://www.sewcanshe.com/). I printed off the instructions and the pattern pieces and then forgot about them as I packed up all my sewing supplies and moved to Tennessee. A few months later, I rediscovered the pattern and decided to attempt a tote for myself - the green and white striped one. I was so happy with the results that I made another for my friend Jessica's birthday (the gray floral), and then I bought a bunch of fabric with which to make more. Get ready for a tote-filled Christmas, friends and family!


The only real challenge I had with this pattern is that when you use the same pattern to cut the exterior and interior fabrics, the interior ends up being too large. So when you tuck one into the other and then topstitch around the open edges, you'll likely have to fiddle with the raw edge of the interior piece and tuck it into the seam allowance quite a bit in order to make it fit.


The other change I made was to line both pieces (interior and exterior) with a lightweight fusible interfacing. The pattern calls for a mid-weight interfacing on only the exterior, but I had trouble with interfacing that wouldn't fuse and a lining that was kind of droopy. Fusing lightweight interfacing to both sides makes the final tote look crisper and cleaner, and it also holds its shape better when I set it down. For the totes shown here, the first one in green and white is double interfaced; the floral and green tote has interfacing on only the floral piece.


And here's one last tote I'm making for myself before I buckle down and start sewing them up for Christmas gifts.


July 30, 2015

Big Finish: Kite Tails Quilt


Another finished quilt to share - and even better, it's my first handmade Christmas present for 2015! Considering the fact that I started this quilt in 2014, I'm not as ahead of the game as it may seem. But still, it's done, so I'll set this one aside for gifting in 6 months and keep the recipient(s) a secret in the meantime.


This project started with a free pattern designed by Amy Friend of www.duringquiettime.com and distributed by the Modern Quilt Guild. The guild shares a unique pattern in each issue of its member newsletter, and this one caught my eye with its simple, subtly off-kilter design and rectangular paper-pieced blocks. I pulled blue and green fabrics from my stash, added a pop of yellow, and incorporated a couple of semi-solids to round it out. The addition of the pink fabrics for a little extra punch came when I only had a few more blocks left to make (and needed a break from all the blues and greens).


My favorite part of this quilt may be the backing fabric, which is an oversized text print from the Social Club collection by Eric and Julie Comstock for Moda. The greens and blues coordinate nicely with the front, and the large scale of the text is perfect for the back. I had to piece the back but did my best to match the print in the seam. Hopefully no one can see it aside from me. I'm happy to have a little extra backing left to incorporate into future projects.

For the quilting design, I created wide X's across each block to mimic the kite tail design. Then I went back and stitched on either side of the vertical seam lines in order to create some separation between the quilted tails. I expect the quilt to get a lot of use, and this amount of quilting is enough to hold it together but still keep it soft and snuggly. I bound it in a navy blue version of the aqua and turquoise fabrics and took a stab at machine binding using a zigzag stitch to ensure that it holds up over time. The finished size is approximately 58" x 70".

June 8, 2015

Couscous Salad with Chickpeas


This easy recipe for Couscous Salad with Chickpeas is one of my absolute favorites. I discovered it a few years ago and have made it many times for office pitch-in lunches and parties with friends. It's best made the day ahead so that the flavors can marry, and it gets better and better as a leftover. I recently pulled it out when my mom was looking for something to make for a weekend getaway with her friends, and as I was digging into the leftovers, I thought, "This is so good. I should share it on the blog." So here you go.

Source: Cooking Light, http://www.myrecipes.com/recipe/couscous-salad-with-chickpeas

Couscous Salad with Chickpeas

Yield: 4 servings (serving size 1 1/3 cups)
Total time: 20 minutes

Ingredients
1 cup uncooked whole-wheat couscous
1/2 teaspoon salt, divided
1/2 teaspoon black pepper, divided
1/8 teaspoon ground cinnamon
1 cup boiling water
3 tablespoons extra-virgin olive oil
3 tablespoons fresh lemon juice (typically 1 large lemon)
1 1/2 teaspoons minced garlic
Dash of sugar
1/3 cup chopped fresh mint (I consider this optional)
1/4 cup thinly sliced green onions
1/8 teaspoon smoked paprika
One 15-ounce can chickpeas (aka garbanzo beans), rinsed and drained
1 large ripe tomato, chopped (can substitute chopped grape or cherry tomatoes)
2/3 cup (3 ounces) crumbled feta cheese

Instructions
  1. Place couscous, 1/4 teaspoon salt, 1/4 teaspoon pepper, and cinnamon in a bowl. Stir in boiling water, cover, and let stand 10 minutes. Fluff with a fork.
  2. In a small bowl, combine olive oil, lemon juice, garlic, and sugar. Add to couscous and stir to combine.
  3. Stir in remaining 1/4 teaspoon salt, 1/4 teaspoon pepper, mint, onions, paprika, chickpeas, tomato, and feta.
Tip: Make a day ahead for best flavor.

June 7, 2015

Big Finish: Chicopee Flowers Quilt

DSC_0758

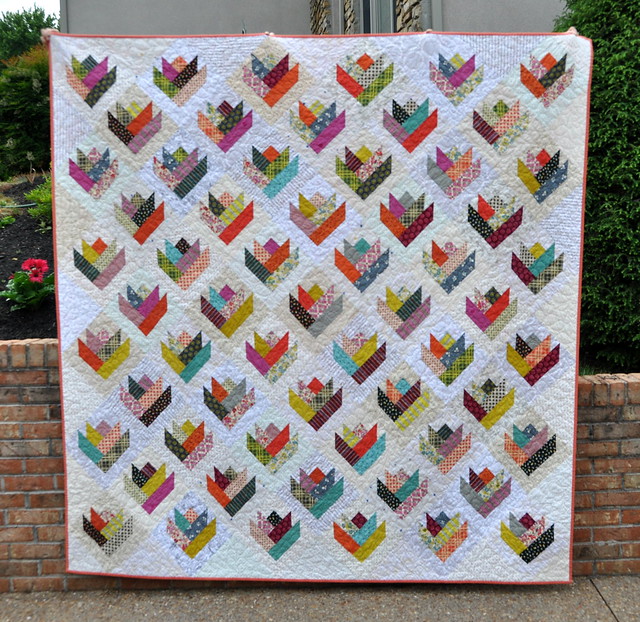
Confession: Some archived photos of my first few blocks for this quilt are dated May 2013, so I'll be honest and say I've been working on it for 2 years. It has always been a quilt I was making for myself, so the timeline was flexible. But now it's finished and I can show it off! I started with a Denyse Schmidt Chicopee jelly roll (2.5-inch strips of DS's Chicopee collection) and a variety of low-volume neutrals for the background, and I began assembling blocks using this flower quilt pattern from the book Jelly Roll Quilts by Pam and Nicky Lintott. It was one of the first quilting books I bought when I got back into this hobby and precuts were at the height of quilty popularity.


I increased the number of blocks to 61 so that it would be a better fit on my full-sized bed -- and then I had to buy a second jelly roll to actually make all those blocks. The blocks are easy to assemble, but with 13 pieces each, they do take a bit of time. Eventually I was chain-piecing 5 or 6 blocks at a time and making good use of my design wall.


For the background fabric, I used low-volume prints purchased from a bunch of different stores, including Indianapolis fave Crimson Tate and NYC's The City Quilter, which I visited on my birthday while on a trip with my mom. I love how this mixed background turned out and how it makes the overall design more interesting.


For the backing, in honor of my dearly departed tiger kitty Jack, I selected a print from Lizzy House's Catnap collection and pieced in another of Lizzy's prints to get the backing to size. The binding is also a Lizzy print. I love how the backing prints coordinate with the colors on the front without being too matchy-matchy.


Because of its size, I sent this quilt to Abby Latimer of Latimer Lane Quilting for longarm quilting using her plumage design. Abby did a wonderful job with the quilting (and also with centering the backing). After being bound, washed, and labeled, this quilt has visited the Knoxville Modern Quilt Guild and has been hanging out on my bed. The finished size is approx. 81 x 81 inches.

Sharing with the Knoxville Modern Quilt Guild

May 26, 2015

Big Finish: MQG Riley Blake Fabrics Challenge Quilt (almost)


This quilt started out as my entry for the Modern Quilt Guild Riley Blake fabric challenge, adhering to the following rules:
  • Make something fantastic that is quilted.
  • Make something you've never done before.
  • Challenge yourself to learn something new.
  • Use only Riley Blake Cottage Garden fabrics and coordinating Riley Blake basics and solids.

The guild provided me with a small amount of 6 fabrics from the chosen line, and I had every intention to stick to the rules. But then I got started and ran out of fabric and well, I got impatient. I ordered more Cottage Garden fabric for the quilt backing, but I also incorporated some non-Riley Blake fabrics, effectively disqualifying my quilt from the challenge competition. And I'm totally okay with that because I'm happy with the design I used and the rogue fabrics I added to the mix.


The design is based on the Pink Ponk quilt from the March/April 2015 issue of Quilty Magazine. I resized the template to accommodate the smaller cuts of fabric I received for the challenge. The new-to-me skill that I used on this quilt is machine applique using a small zigzag stitch. I used freezer paper to press the rounded edges before stitching each half circle in place on its rectangle background piece. For the quilting, I first stitched the modified star design in the space between each circle shape, and then I created that same star shape within each circle, using curves to connect the midpoints. The resulting design resembles an orange peel pattern. The finished size is 39 x 41 inches.