Pages

December 29, 2016

Pineapple Mini Quilt and Swap


In August of this year, we did a big family vacation at Wild Dunes in Isle of Palms, South Carolina. From Colorado, Tennessee, and the other end of South Carolina, my parents and siblings with their kids gathered for a week at the beach, and we all had a great time -- especially all 5 little girl cousins.


Three years ago we planned a similar vacation (with fewer children at that point) in Folly Beach, South Carolina, and that's when I reached out to my old friend, fellow quilter, and Charleston resident Kelly about getting together and swapping table runners and scrap bags. Here's the result of that swap, which was loads of fun. I love my table runner from Kelly and have it hanging on the wall of my guest room now.


Since I was going to be in Kelly's neck of the woods again, I asked her about getting together and doing another swap. This time we settled on mini quilts, and we both got to work, sharing a couple of sneak peeks along the way.


And when I was on vacation with my family, Kelly came by for a visit with her parents, who were in town to see her from Ohio. The other thing about me and Kelly is that we went to college together and her parents are my godparents! Long ago our parents were best buds in Indiana, and they haven't seen each other in 18 years -- how cute are they?!


Back to the quilts. I decided to make this patchwork pineapple for Kelly because it's crisp and bright and the pineapple is a symbol for welcome. I'd seen it here and there online and thought it would be perfect for her. I added some simple hand quilting in perle cotton to accent it without being distracting.


And Kelly! She made me this amazing mini quilt of kittens, with lots of low volume fabrics and bits and pieces of pastel prints -- including some from the scrap bags we exchanged three years prior! Surely we're quilting kindred spirits, because Kelly hand quilted hers with perle cotton too, giving the kittens whiskers and adding decorative x's and stars and lines to add texture and interest. I just love it and it has found a home on the wall in my house where I can admire it as I walk past it all the time.


I love this little tradition of ours and can't wait to see what we swap on our next visit!

December 27, 2016

Two-Sided Toddler Quilt

My niece Penny, who is almost 3 now, loves little blankets and got very attached to a small doll quilt that I made her last year. In the majority of the pictures my sister sent me, the plainer back side of the quilt was always facing up! For her birthday earlier this year, I decided to make Penny another small quilt that was two-sided, meaning that it would be cute and colorful regardless of which side ended up.


On one side, I used small patchwork squares in bright colors to create a heart with a background of mixed low-volume fabrics. Extra strips at the top and bottom brought this side up to size.


On the other side, I created scattered wonky stars in more bright colors. The background fabric on this side is just white.


She loved it -- here it is sideways!


This little quilt has become one of Penny's favorites, and she takes it almost everywhere. It's good for snuggling on the couch, and she's even shared it with her baby sister.


I expect I'll be making more of these small quilts as the girls get older, and I'm not complaining. Small quilts are fast and fun and a great way to experiment with patterns and techniques without committing to a larger project that requires more investment of time and money in materials.

September 5, 2016

4-Patch Hourglass Block Tutorial


The Knoxville Modern Quilt Guild, of which I am a member and secretary, supports a local nonprofit, The Restoration House of East Tennessee, year-round by providing quilts to the women and their children who "graduate" from their program to live on their own. The guild tries to always have one completed quilt ready and one in the works. It's time to start working on the next quilt, and we've chosen a 4-patch hourglass block -- there are four blocks pictured above.

I made one block to test out the technique and fabric choices, and then I decided to write up a tutorial for our members -- and post it here for everyone. After the first block, I made a second one just because. Then I needed to make a third block in order to take photos for the tutorial. And then I thought four blocks would make a better photo here, so basically things got a little out of control. But now we have four blocks for our charity quilt!

4-Patch Hourglass Block
Unfinished size: 12.5" using a scant 1/4" seam allowance
Finished size: 12"

Step 1: Select 4 fabrics and cut one 7.5" square from each. I chose to coordinate the fabrics in pairs but didn't pay much attention to how the pairs coordinate with each other, as the finished quilt will feature many different fabrics.


Step 2: Place the squares right sides together in pairs, pin, and draw a line from one corner to the other.


Step 3: Sew 1/4" away from both sides of the line.


Step 4: Using a ruler and rotary cutter, slice the block in half on the line, then again along the other diagonal. If you're able to make the second cut without moving the block, your pieces will be more accurate. Below I've separated them slightly to show the cuts that I made.


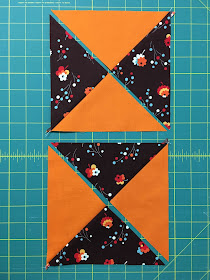
Step 5: Open each of the four sections and press the seams to one side. I pressed all seams toward the print fabrics so that the seams would nest (fit together more precisely) when I sewed them into hourglass blocks. Below you can see how the four sections will come together to form two hourglass blocks.


Step 6: Sew the triangle sections together to create two hourglass blocks. Press the seam open, and then trim the block to 6.5" square. (This darn photo won't flip, but you get the idea.)


Step 7: Arrange your four blocks however you like, and sew the top two together and the bottom two together. Then sew the top row and the bottom row together for a completed block.


 And there you have it -- a 4-patch hourglass block!


July 24, 2016

Big Finish: Mini Quilt to Swap

Foundation paper piecing
Modern quilters like to swap - blocks, mini quilts, pouches, all sorts of things. I've never participated in a swap because deadlines and expectations both stress me out. But when I heard that the Modern Quilt Guild chapters in Memphis, Nashville, Chattanooga, and Knoxville were joining together for a mini quilt swap, I decided to join the fun. Those of us who signed up filled out a short survey about our likes and dislikes in terms of technique, color, and style. We were assigned partners based on this information and given a couple of months to make and send a mini quilt.


My partner lives in Cleveland, TN, and is a member of the Chattanooga MQG. I found out that she's been quilting for 40 years (!), likes bold colors and prints, enjoys improv and twists on traditional designs, and prefers fall colors (not crazy about blues). For her mini quilt, I decided to make a few blocks from a quilt pattern called Garden Chevrons (designed by Kim Cairns) that had caught my eye in the March/April 2015 issue of Quilty. I knew I could size it down for a mini, and it was a good pattern to incorporate a variety of fabrics.


I liked the foundation paper piecing element of this pattern (it's one of my favorite techniques) but did not enjoy the partial seams required to get the hexagons to fit together. I came thisclose to throwing in the towel and starting over with a new pattern, but my friend and fellow Knoxville MQG member convinced me to push through the frustration. So I stepped away from it, and when I tried those partial seams the next day, they worked.

Quilted and ready for binding

Bound and labeled

A few additional treats for my partner

The mini quilt I received came from a member of the Nashville guild. It's amazing!


June 2, 2016

Baking Cup Wreath


If you're looking for a craft project, or if you want to make a wreath for your spring or summer decor, look no further. My job requires me to watch a lot of videos and navigate some pretty popular websites, and when I came across this wreath tutorial, I knew I had to try it: http://www.hgtv.com/design/make-and-celebrate/handmade/baking-cup-wreath.


I bought a few wreath forms and used lots of coupons to pick up baking cups in a variety of colors from my local craft store.

I saw these at a craft store AFTER I bought mine -- this is a much better deal, especially with a coupon, so shop around!

My mom came over, and we fired up the hot glue guns. Here are a few notes:
  • The online instructions don't explicitly tell you to flip the baking cups inside out before gluing one inside the other, but you should flip them. You can infer it from the photos, or just trust me. And you can flip a whole stack at once when they're still nestled inside each other from the package, then separate them out to start gluing.
  • If you're doing this project by yourself, I suggest that you glue lots of cups together, and then spend time crinkling them all up into flowers. That way when you finally get to glue them on the wreath form, you can do just that without stopping to make more. Or, even better, get a buddy to make a wreath with you and you'll get to the fun part -- gluing paper flowers on the wreath -- even faster.
  • You can make one-color blossoms or mix two colors. I made and used only one-color flowers, but my mom mixed some baking cups together and used two-color blossoms in her wreath for a different look.
  • The tutorial says to put glue on the wreath and then put the flower in place, but the photo shows the glue being applied to the flower -- do it that way. It's much easier to get the flower where you want it when it has the glue on it. Also, hold each flower in place for a few seconds to let the glue set slightly before you move on to the next flower.
  • I found it easiest to start at the top of the wreath and work my way around, covering the form as I went as opposed to scattering flowers and then trying to fill in the gaps. When I got back to the top, I left a gap and added a hanging ribbon with a little glue; then I filled in the space with the last of the flowers.


I liked the whiteness with pops of color in the inspiration wreath, so I started on the one below, made it about halfway around, and had to get more white baking cups. If you want to do one dominant color, buy twice or even three times the number of cups. You can always use extras for, you know, cupcakes and muffins.


My mom came up with her own variation: a cluster of flowers on one side and coordinating ribbons on the rest of the wreath. I like the lighter look, and the ribbons really brighten it up.


I gave my first all-color wreath to a friend for her birthday, and then I made another one as a Mother's Day gift for my sister. The yellow pops off her red door nicely. This would be a great project to feature team or school colors, fall colors, or red, white, and green for the holidays.

April 12, 2016

Big Finish: Judy's Baby Quilt


My roster of nieces grew by one last month, so of course I had to make her a baby quilt. My sister was good enough to go along with my suggestion of a Joel Dewberry charm collection (with a few miscellaneous additions), and she chose a diamond design based on color values. I know this isn't her first choice of fabric, so I've promised to make Judy a larger quilt when she gets a little older. For now, this baby size is just right for napping.


The longarm quilting was done by my fellow Knoxville Modern Quilt Guild member Pat Pike, who always does a fantastic job. I really like this squared chevron design.


March 13, 2016

2015 Quilts in Review

It's the middle of March and far too late for a 2015 recap, but this post has been in progress for a while so bear with me. I worked on other projects in 2015, but these quilts feel like my biggest accomplishments given the time involved. Some of these projects slipped under my blogging radar for one reason or another, so this is a great opportunity to fill in those gaps and do one final round-up. So here goes!

1. Cottage Garden Circles (see blog post here)
MQG Challenge with Riley Blake fabrics (rules loosely followed)


2. Chicopee Flowers (started in 2013! see blog post here)
For me!


3. Kite Tails (see blog post and more photos here)
Given to my brother, sister-in-law, and their daughters for Christmas


4. Sunny Check Plus
Commissioned for a family friend's grandson. Pattern from Quilty Magazine, Nov/Dec 2014 issue


5. Woodland HSTs
Made with woodland animals fabric won in an online giveaway - an effort to try to use up this fabric!


6. Ole Miss Pinwheels
Commissioned by my former boss for her friend's new baby. The logo was a challenge to figure out. At first I was going to embroider it with a satin stitch, but I got to the M and realized that was a terrible idea. So I printed a logo found online, enlarged it, and turned it into essentially two appliques - red on blue and then blue onto a blank square in the quilt top layout.


After machine quilting around the applique square, I went back and hand quilted around the applique.
Requested label in the shape of Tennessee

7. Halloween Pillows
I'm counting these as quilts because they're paper pieced and pretty intricate as far as pillows go. I made them as gifts for my two friends - sisters - whose birthdays are near Halloween.


8. Penny's Hexies
The perfect doll quilt for my little niece. I made this using a tutorial from a Knoxville Modern Quilt Guild meeting and simply quilted the hexagons onto two fat quarters. I gave this to Penny for Christmas and she loves to put it on her lap (back side up, of course) when she's reading to her babies.