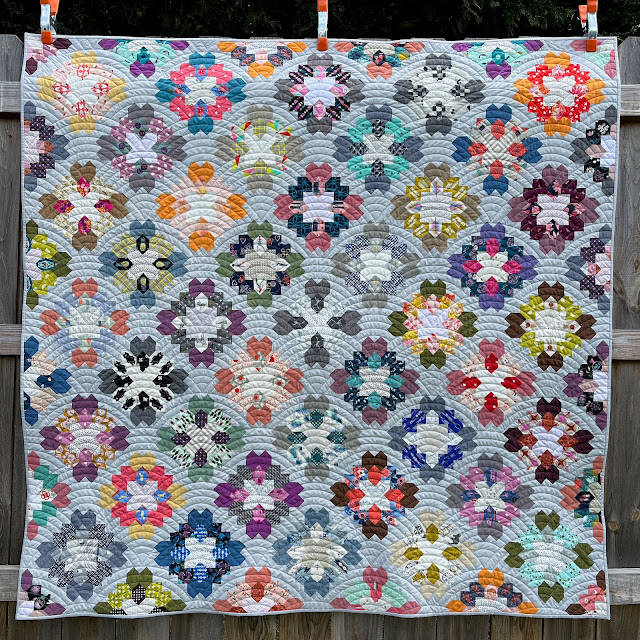
I'm happy to share that this quilt is finally finished after almost 6 years in the making! It started as a hand-sewing project I threw together quickly for a trip to Dallas to visit a good friend and her twin newborns. Here's the first block I made:
After that first block, I was fully hooked and continued making blocks using original Cotton + Steel fabrics and then Ruby Star Society prints paired with Andover chambrays (I had a fat quarter bundle that I drew from exclusively) for the corners. I
wrote a little bit about my process in 2018, about 6 months into the project. It's funny to look back and see how it was going all that time ago.
All the individual blocks are documented on my Instagram (@elizabethquiltsplus) under #inspiremelucyboston, if you'd like a closer view of each one. Depending on the fabrics, some are fussy cut to highlight a particular motif, and some are not. I love them all, but here are a few of my favorites:
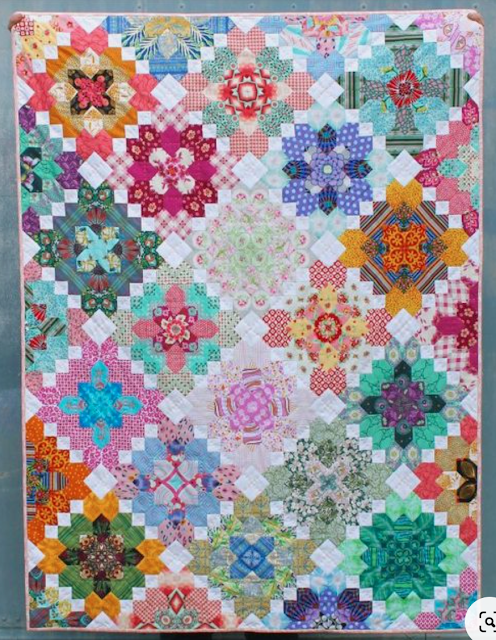
The final block count is 41 whole blocks, 16 half blocks around the edges, and 4 quarter blocks in the corners. For the layout, I decided pretty early on to do something a little different from the traditional Lucy Boston/Patchwork of the Crosses, which has a lot of joining/background blocks. I found the Lucy's Terrace version by Tales of Cloth and loved the on-point layout and minimal background:
In the end, I kept the blocks on point but changed the background a bit, using honeycombs where this one has small squares, and I put small squares next to the big squares. I used a dove gray RSS blender, Spark, for the background and love it so much with all the colors in the rest of the quilt. I'm glad I went with a color and not white for the background.
A lot of EPP projects like this end up as blocks sewn to background squares as applique. I knew I didn't want to go that route, but piecing the entire top was quite a challenge. And no one really talks about what happens after you make all the blocks! Sewing the blocks into rows was mostly fine once I got the hang of it, but sewing the rows together was really an adventure, having to adjust and turn and fold and contort everything to be able to get into all the angles. Honestly I'm shocked that it all came together and all the pieces actually fit!

I recorded the date of my final stitches on the quilt top -- June 23, 2022. That's almost exactly 5 years after I finished the first block in 2017! After the top was complete, I'll admit that I let it sit while I thought about how to quilt it. I considered hand-quilting, but that would have taken a lifetime, and I was concerned about hand-quilting through all the seam allowances (there isn't much open space in this quilt!). In the end, I decided that done was better than "100% made by hand," and I handed it off to my go-to local longarmer. I wanted the quilting to be traditional, and we decided on the classic Baptist fan.

I'm so thrilled with how it turned out. The quilting creates a lot of great texture and bounces the eye around the quilt without distracting from the piecing and the blocks. The size is roughly 65x65 -- plenty big enough to actually use if I decide to put it on my bed or use it as a throw for a little while. The backing is a wideback by Alexia Marcelle Abegg for Ruby Star Society (gotta keep on theme with the front!). I'm always drawn to navy (this print also comes in peach and light blue, and I considered all of them), and the hands in the design are a nice callback to the hand-piecing.

All in all, I'm happy to have this quilt finished and feel quite proud that I stuck with it to the end. Honestly I really loved the process of making the blocks, taking my little EPP kit with me on vacations and pretty much anywhere I thought I might have some downtime. Picking out fabric combinations was a lot of fun, and I kinda miss it! I have some templates and papers for other EPP designs, and I plan to start a new project soon.


